Showing posts with label marsmunster. Show all posts

Saturday, July 25, 2009

NOTD: China Glaze For Audrey


It seems like China Glaze is ever growing in popularity. This is most likely the most talked about color. The shade is smiliar to the iconic Tiffany & Co. wrapping. I almost wanted to put little white bows on the tips to complete the look.


It's love <3

Sunday, July 19, 2009

When To Toss Your Makeup


1. LOOSE GLITTER: 2 years - MAC Pigment in Mutiny, $20, maccosmetics.com

2. LIQUID FOUNDATION: 6 months - Clinique Perfectly Real Makeup, $23, clinique.com

3. LIPSTICK: 1 year - Tarte Vitamin Infused Lipstick, $22, tartecosmetics.com

4. PRESSED POWDER: 18 months - Neutrogena Mineral Sheers Powder, $13, drugstore.com

5. POWDER BLUSH: 2 years - Bobbi Brown Blush in Desert Pink, $22, bobbibrowncosmetics.com

6. LOOSE POWDER: 2 years - Bare Escentuals bareMinerals Foundation SPF 15, $25, nordstrom.com

7. LIQUID LINER: 6 months - Prestige Liquid Eyeliner in Azure, $5, amazon.com

8. LIQUID HIGHLIGHTER: 6 months - Lorac Oil-Free Luminizer in Gold, $28, sephora.com

9. EYE SHADOW: 2 years - MAC Eye Shadow in Submarine and Illegal Cargo, $14, maccosmetics.com

10. MASCARA: 3 months - CoverGirl LashBlast Mascara, $8, drugstore.com

11. LIPGLOSS: 1 year - DiorKiss Luscious Lip-plumping Gloss in Mango Soda and Berry Smoothie, $20, sephora.com

12. EYE LINER PENCIL: 1 year - Urban Decay Glide-On Eye Pencil in Electric and Covet, $16, urbandecay.com

13. CONCEALER: 1 year - Benefit Erase Paste, $26, benefitcosmetics.com

14. CREAM BLUSH: 2 years - Nars the Multiple in Orgasm, $37, sephora.com


Don't worry it makes me sad too... but I'd rather be sad than have fungus growing in my makeup.

<3
Chelsea

Lush's CoalFace Review


Now don't get me wrong, I love Lush just as much as the next person but I wouldn't consider myself a lush "junkie." I've spent a good deal of money there but nothing that would be considered unhealthy. I choose to do that MAC, but anywho. The other day while I was visiting our local lush I was browsing the facial cleansers. I already have Angels on Bare Skin but I've been having a little bit of trouble with oil recently because of the crazy Las Vegas weather we've been having. So I was looking at the Dark Angel scrub when one of the sales people came up and started to tell me that Dark Angel is made for people with REALLY oily skin, and unless I have super oily skin it's gonna dry me out and do more damage than good. Afterwards she pointed out Coal Face, which is made for people with oily to normal skin. Now I have combination skin, so I don't have a very oily face but what she said next is what sold me. She explained that she has combination skin and she'll wash her face with the Coalface and then Angels on Bare Skin. The oil absorbing effects of the Coalface keep the oil at bay, while the Angels on Bare Skin moisturize and heal the other damages, so it seems like a perfect mix. And when things seem perfect, get them. So here's what I think.


What they say:

Who would have thought charcoal and liquorice could get along? One is tough and gritty, the other sweet and syrupy. But charcoal and liquorice could just be the odd couple of skin care, teaming up to fight oily, troubled skin in our Coalface cleanser. Powdered charcoal removes impurities and mildly exfoliates while liquorice heals naturally. Sandalwood oil tones the skin (and mediates should charcoal and liquorice disagree about anything). (via: Lushusa.com)

Ingredients:

Liquorice Root Decoction (Glycyrrhiza glabra), Propylene Glycol, Sodium Palm Kernelate, Sodium Stearate, Rosewood Oil (Aniba rosaeordora), Sodium Lauryl Sulfate, Powdered Charcoal, Sandalwood Oil (Santalum album), Glycerine, Sodium Chloride, EDTA, Tetrasodium Etidronate, *Linalool, Perfume, Silver Edible Lustre (Potassium aluminum silicate, Titanium dioxide, Iron oxides and hydroxides).
*Naturally occurs in essential oils (via: Lushusa.com)

How to Use the Product:

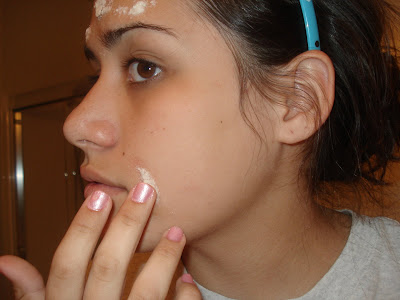
Moisten the cleansing bar with water and rub in your hands to create a lather. Apply to your face in a gentle, circular motion, rinse thoroughly, pat dry.(via: Lushusa.com)

Product: 3.5 out of 5
Packaging: N/A
Quality: 4 out of 5
Overall: 4 out of 5
Would I buy again? Yes
Where to buy: Lush.com, Lush Stores
Price: $51.80 per pound

PROS:
-Nice lather
-A squeaky clean feeling after rinse
-Minimized pores
-Balanced oily skin
-Nondrying


CONS:
-Smells like licorice
-The run off is black which makes a mess
-"Melts" easily, so it needs to keep dry.
-Expensive

Overall?
Over all I do like this product, it's expensive though. Also it seems for some people it has the exact opposite effect that it's suppose to give. For some I've hear it's overly drying and and causes them to break out. I haven't had that problem yet, but all in all I seem to have very good skin. Also to counteract the drying, which is the oil being absorbed I wash my face with Angels on Bare Skin as well. Which is very moisturizing. I suggest though you do use a excellent moisturizer if you're planning on using this wash as your primary cleanser.

For the price, it's a luxury not something that is a necessity. While I did see an improvement in my skin, its not enough for me not to cringe at the price. For 51 dollars want to be scrubbing my face with gold, not coal. But I give props to Lush, I'll buy it again. And they can laugh all the way to the bank. But it's an excellent face wash. I'd recommend it to a friend


Tuesday, June 30, 2009

Summer Makeup Bag


So I've had a request to explain what I would keep in my makeup bag. I'm not sure if you've seen my 'whats in my purse' but I have waaay to much stuff that I tote around. First off I personally for summer you shouldn't be wearing a lot of makeup. You should be out at the beach and swimming. However if you must know, this is what I suggest you carry in your makeup bag for the beach


This first thing isn't something I would really carry around, however I really suggest it. Secret Clinical Strength Deodorant, if you can get the water proof formula. I love it. It's perfect to toss into your purse just in case you need a little touch up for the day. I don't really suffer from wetness, but this one makes it so I don't even suffer at all. I love this product so so much. It's a staple for my summer routine.


SUNSCREEN! Must I explain the importance of this? It's summer, and if you live anywhere like I do, it's sunny as all get out. Unless you wanna become a crispy critter may I suggest you invest in a very nice sublock. It's a plus if you find one that smells nice as well!

Another essential for summer makeup bags is a nice bronzer. One of my personal favorites is Stila's bronzer. I have it in Shade 01, and I love love love it. It doesn't have too much shimmer, it's just perfect for my skin tone. Really you need to shop around for the perfect one. Physcians's Formula has a really nice one called Bronze Booster, I have that one as well which I would suggest whole heartedly. I suggest you have two bronzers. One that has some shimmer for a little bit of fun, and a matte one for just a glow.


For lips you'll want to stay away from glossy products because they'll act as tanning oils for your lips which will cook and crack them. Kinda like the way butter cooks eggs. So unless you want friend lips I suggest you stick with a lip product with spf. The MAC tendertone is a good one, with spf 15 and a nice color it's perfect for those nights when you leave the beach to go out for dinner. If you want excellent lip protection I suggest Burts Bee's Lifegaurd's Choice. It's the best lip protection out there. However it has zinc in it which will turn your lips white. I guess then you'll have to decide if it's gonna be protection or pretty.

I don't suggest you use eyeshadow when going out to places with water. It's summer, and once again your makeup shouldn't be your first concern. However if you guys are like me and feel some what naked without your eyes all pretty the MAX Factor Vivid Impact Duos are absolutely amazing. I would say you almost don't need to carry a brush, because the applicators can blend! If that fails or you don't want to mix the products, these shadows are soft enough for you to blend with your fingers. They come in a nice variety of shades so you can find the perfect one to match your skin tone or your bathing suit. I think they're a perfect thing to have in your makeup bag so you can throw on a simple wash of shadow before you go out to eat after a long day at the beach.
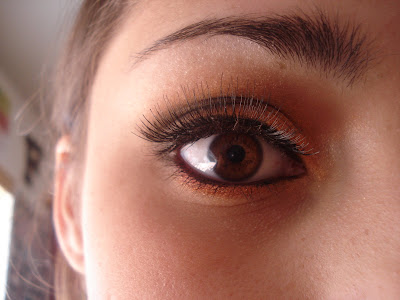
The final thing that I suggest that you have in your makeup bag is a good water proof mascara. Now you don't need to run out to sehpora and buy the most expensive one you see. Personally I believe drugstore mascara is just as good as high end if not better. For me personally I love the covergirl Lash Blast mascara. Not only is it a fabulous mascara it has a waterproof formula which is perfect for the beach. Now I don't suggest getting your face wet and rubbing it because you will most likely have some bleeding, but other than that if your face gets splashed by a wave or an evil little brother you won't look like you just got dumped on prom night. However just like any eye product, if you're planning on getting dunked or going underwater mascara isn't really necessary.

I hope this has helped you guys out on trying to decide what you should keep in your makeup bag. Please feel free to leave a comment and tell me what you guys use for your summer makeup bag or any other suggestions what you think should be kept in there.

Like always, feel free to ask questions!

<3

Chelsea

Friday, May 22, 2009

Basically Beauty Basics: Concealing Blemishes


So let’s face it, no one has PERFECT skin. Sure, some people have been given the gift of really good skin. However there’s always that little bump or blemish that pops up unexpectedly. No need to fret however, concealer is here to have the day. I’ll show you how to cover those nasty blemishes and give the illusion that you do in fact have that perfect face.

How to Conceal Blemishes

1. Your first step is not to worry. Everyone gets a zit every once in a while. It’s not the end of the world. All you need to do is calm down and gather your supplies. You’ll need a nice creamy concealer, a concealer brush, and a foundation brush in order to blend everything together. Here I used Neutrogena’s mineral concealer in Buff and for my brushes I used my Essence of Beauty conceal/foundation brush


2. Before you begin to conceal anything make sure that your face is moisturized. A moisturized face makes for a better canvas. After you have moisturized, dip your concealer brush in the concealer and begin to apply it to the spots needed on your face. You don’t want it too heavy but enough to cover the blemish.

3. After you have all the spots you want concealed covered, take your foundation brush and blend the concealer so it blends seamlessly into your skin giving you that flawless coverage. Make sure you get every single spot.

4. Once everything is blended, you’ll want to set the concealer, the Neutrogena concealer I’m using has a translucent setting powder on the bottom. But any kind of setting powder will work. If your using a powder foundation you can skip this part, but I still like to set it just to help it last longer. To set your concealer dip a clean concealer brush into the power and pat it over the spots that you had concealed. Make sure to blend and see to it that none of the powder is seen, this is why a translucent powder is amazing.

5. Now that you have set your concealer you can move onto your foundation, or if you just needed to cover a few spots, you can rock the natural look.

If you have any questions or any other ideas for Basically Beauty Basics feel free to contact me either through youtube or via email: marsmunster@gmail.com


<3
Chelsea

Monday, May 11, 2009

Vintage Green Tutorial: Golds and Greens

Well, it’s kinda funny because I couldn’t figure out how to do my makeup. Usually I find a shirt I’m gonna wear and then do my makeup based on the outfit. So I started to do my makeup and I came up with this look. It was so bizarre because I found this old shirt that I hadn’t worn in forever. I didn’t take pictures while I was doing the look because I’m a dork butt. I have the list of stuff I used! So enjoy!


Things Used in this Look:

Eyes:

Urban Decay Primer Potion: All over the lid and browbone

Revlon Revlon Cream Shadow in Not Just Nudes: All over the lid

HIP Duo in Gilded: The gold side all over the lid

NYX Eye Shadow in Lime Green: The outer two thirds on the lid

NYX Eye Shadow in Green Tea: Crease

NYX Eye Shadow in Aloha: Highlight

Jane Mineral Eyeliner in Black

Covergirl Lash Blast Mascara


<3

Chelsea

Monday, May 4, 2009

Maybelline Lash Stiletto Mascara Review


This is one of those makeup products who had a commercial. Let’s face it, if a product is on TV there’s gonna be a lot of hype. This mascara is no exception. So I joined the craze and I went out and I bought it. This is what I think:


Product: 4/5 out of 5
Packaging: 4 out of 5
Quality: 4 out of 5
Overall: 4 out of 5
Would I buy again? Indeed
Where to buy: Any local drugstore that sells Maybelline, you can also purchase it online
Price:
$7-9; like most things you can sometimes get it during a sale and in which you can bbuy one get one or get it half off. Just look around.

PROS:
-It has possibly the world’s cutest packaging
-The wand has a wonderful brush that goes from narrow to wide which is good for inner lashes.
-A nice lengthening and separating formula
-B5 vitamin which nourishes the lashes
CONS:
-It really doesn’t do much for volumizing the lashes
-It says that it has a paten shine, but in reality it’s just a wet look. It’s not really a bad thing but it doesn’t do what it says it does.
-It’s not water proof D:

Overall?
I really do like this product, the packaging sucked me in, I’m a sucker for cute things. This bottle is definitely cute. I really can see a difference in my lashes when I have it on and when I don’t. I feel like I need to do a little bit of a comparison though. If it was between this mascara and covergirl’s lashblast. Covergirl would take the cake. I think my number one complaint is about the product is that it’s not waterproof. Now there isn’t any flaking which is good, but if you rub your eyes or tear up you’re going to have raccoon eyes. So really just be careful on the days your wear this mascara and try not to rub your eyes that much. Overall though, it’s a really nice mascara. I’d definitely recommend it to a friend and buy it again!
Before

Application

After


<3
Chelsea

Thursday, April 30, 2009

Smokey Brown Look Using Mineral Eyeshadow

I’ve been on a mineral kick lately. Last summer I purchased the Bare minerals starter kit which came with almost everything I needed to do my face make. I love that kit so much. It introduced me into the wonderful of mineral makeup. Since then I’ve explored Maybelline Mineral Power and its all very nice things. Since that last summer I’ve had my eye on the other bare minerals kit, the eye kit. It has beautiful browns and peaches, and it’s just a lovely kit. Not to mention the brushes that comes along with it.
I finally broke down and bought the kit, and it was everything that I hoped it would be. It has beautiful browns and the amazing peaches. It’s love. So since I couldn’t wait to try out the kit, I was home sick and I did my makeup. I ended up creating this smokey brown look that I absolutely love.

Things used in this Look:
Eyes:
Urban Decay Primer Potion: All over lid and brow bone as a primer
Vanilla Sugar: All over brown bone as a highlight
Peach Puff: All over lid
Soft Focus Explorer: Place in the crease about two thirds into eye, darken from a more dramatic look.
Fashionista: Used on the outer V, and with a little Fix+ as eyeliner as well.
Maybelline Lash Stiletto Mascara
Stubborn Eye Khol


<3
Chelsea

Wednesday, April 29, 2009

Haul Time!


So with economy the way it has been I haven’t been hauling as much as I use to. Let’s face it, a lack of a job and everything just being plain cruddy it really hasn’t been a good time for shopping. But this past weekend my boyfriend took me out for a wonderful shopping trip. (He even drove because my car was in the shop.) We hit up a whole bunch of store and found some great bargains. I’m just going to post the pictures below and tell you what it is. If you want anything more detailed just lemme know and I’ll be happy to oblige. Enjoy!

Flirt Blush in Pink Tutu

NYX Round Lipsticks in Harmonica andNarcissus
NYX Lipgloss in Pink Frost
Sugar Lipgloss in Swizzle and Acrylic

Maybelline Lash Stiletto Mascara in Soft Black

NYX Trios in Golden/Rust/ Bronze, Purple/Deep Purple/Prune, Aloha/Mink Brown/Deep Bronze

HIP Duos in Forgiving and Adventurous
Prestige Duos in Tartan and Passionfruit
Covergirl Single in Platinum.

Milani Eyeshadow in Lily White, Blue Lagoon, and Shamrock

Lancome Mousse Blushes in Raspberry Souffle, Peach Melba, Cinnamon Glaze

Biosilk Silk Therapy, Chi Silk Infusion, Bed Head Control Freak Conditioner

Ecotools Powder Brush and Foundation Brush and Bare Essentuals Eye Brush Trio

Bare Essentuals Eyeshadow in Peach Puff, Soft Focus Explorer, Fashionista, Vanilla Sugar

Neutrogena Quad in Moonlight Violet


<3
Chelsea

Sunday, April 19, 2009

Goldfish Inspired Look


I'm finally entering a contest, I usually think about entering them, but then it takes me ages to get around to finally record it, and by then the contest is usually over. Or I'm just lazy and don't do it. But hey! Lookit, I did it. I actually did a contest. I'm not gonna lie, this one was really fun.

The contest is for sayanythingbrooke, and you're suppose to create a look based on your pet. Now, we all miss my dear lizard Mary Jane who has passed on, but luckily I still have my goldfish whom is the inspiration for this look


So lets get into the products I used and what I did!
Face
  • Smashbox Photo finish primer
  • Maybelline Mineral Power in Medium 2
  • Maybelline Mineral Power Finishing Veil in Medium
  • Sally Hansen Blush in Etheral
Lips
  • Vaseline
  • Rimmel Lipstick in Crush
  • MAC lusterglass in Love Necter
Eyes
  • Urban Decay Primer Potion
  • HIP Color Rick Cream Crayon in Attentive
  • Matte Loose Orange Eyeshadow (I used one of the fake MAC ones I have)
  • 88 Matte Palette: 9 column to the right, and 3 colors down
  • 88 Matte Palette: 9 column to the right, and 5 colors down
  • 88 Matte Palette: 1 column to the right, and 4 colors down
  • Jane Mineral Gel Eyeliner in Black
  • Maybelline Define a Line in Onyx
  • Lash Perfect Eyelashes in S747S Black

How to accomplish the look
  • First thing you're going to want to do is prime your eye with your favorite eyeshadow primer, I used UDPP. After that has dried apply HIP Color Rick Cream Crayon in Attentive all over your lid and just a little bit into your crease.
  • Once you've done that, get a flat shader brush and take a loose matte orange eyeshadow and wet your brush with a mixing medium or FIX+. Then apply that all over your lid all the way up to to a little past your crease below your brow bone


  • Next take your costal scents palette and use the 88 Matte Palette: 9 column to the right, and 3 colors down and apply that in your crease.
  • Then take the 88 Matte Palette: 9 column to the right, and 5 colors down and apply it to the outer two thirds of your lid.


  • Next take any matte black and a crease brush an apply it half way into your crease and in your outer V. Next, the most difficult part. BLEND! BLEND! BLEND! I mean guys, BLEEEEND YOUR LITTLE HEARTS OUT.


  • Once everything is blended to look good, just take a matte flesh colored brow highlight and place it on your brown bone. After that you're good to line your upper lid and water line, and apply your falsh eyelashes. Then you're all done! A nice pink blush and a goldish nude lip would looke good with this.


I hope you guys like this, and don't forget to wish me luck on the contest! Maybe with some luck, I'll win!


Oh yes, I said I would explain the story to why my fish's name is Francis is dead. I need to preface this with that my father and I have a very interesting and special relationship and I love him very very much.


Now into the story, when i bought my goldfish I initially bought two, and I couldn't think of a name for the two. My dad suggest I name them Patti and Francis. Which are the names of my parents. Well my dad was making fun of me for some reason that I don't remember and I told him that Francis died. But he really hadn't, and my dad was momentairly upset. Once I told him that the fish wasn't dead, it became an ongoing joke that Francis is dead. Which we just decided one day that We would just change his name to Francis Is Dead. Since then, the name has just stuck. Unfortunately Patti DID die, but Francis is dead is still alive an kicking.

<3
Chelsea

Saturday, April 11, 2009

Aspirin Acne Spot Treatment


With prom right around the corner for some, or perhaps another big occasion acne is last thing anyone wants to worry about. However it almost always seems that the night before the big day a huge eruption explodes on our face leaving us with a horrible painful zit. The huge red menace can ruin a perfect evening, but not anymore! This homemade acne spot treatment helps reduce redness, pain, and swelling all with ingredients that can be found in an everyday home. After a short 10-15 minutes you will see an immediate improvement and the next day a dramatic change.


 Aspirin Acne Spot Treatment


1. First you're going to want to gather your ingredients. You'll need 5 basic items:
  • A small mixing dish
  • A spoon
  • Aspirin (I used 4, you can use more or less depending on how much you need)
  • 3/4 teaspoon of water (again this changes with how much aspirin you use)
  • 1/2 teaspoon of honey
  • Optional: Tea Tree oil, Aloe Vera, Lavender Oil (2-4 drops)


2. Once you have all your ingredients place your aspirin into your mixing dish. If you put it near an edge it'll make mixing easier


3. Now get your water and pour it over the aspirin, you may need to add more. But remember it's easier to add than it is to take away. Once the aspirin has been saturated take your spoon and begin to mash the pills. It should smash with ease into a sandy paste. If it doesn't, add a few more drops of water until you have the correct consistency.


4. After you have the sandy paste load your honey onto the spoon and drizzle that into your paste. Make sure you don't add too much because you don't want to liquefy the mixture, you want to keep it relatively thick; think Elmer's Glue.


5. You can stop here, or you can add your optional ingredients. I'll be using Tea Tree oil which is known for it's healing properties for acne. Lavender oil also works great for acne and really any other kind of healing. This step is up to you if you choose to add anything make sure you know it's safe. I got my Tea Tree oil from CVS, and 2-4 drops will suffice.


6. Before you apply the treatment make sure your face is clean and free of any dirt, oil, and makeup. A clean face is essential for any acne treatment.

7. To apply the mask all you need to do is take a clean finger and dip it into the mixture and scoop some up and press it onto the spot. Make sure it's completely coated. Going with the whole mountain analogy "make sure the mountain is covered with snow."


8. It's time to play the waiting game now! You'll need to wait about 10-15 minutes for the treatment to harden and for the spot to be saturated with the acne fighting ingredients.

9. In about 10-15 minutes the spots should be hard. Take a warm damp wash cloth and scrub the spots in a circular motion to help exfoliate the spot. Then take a clean portion of the wash cloth and wipe away the treatment. Repeat until you entire face is clear.

10. After your entire face is wiped off wash your face one more time just to make sure every thing is off. Don't forget to moisturize!


<3
Chelsea